Thursday, December 25, 2014

The Sims 3 : How To Install Nras Debug Enabler


Download HERE

My Quick and Dirty version for installing CC and Mods.

  1. You cannot do this while your game is running as these files are in use, so turn the game off.
  2. Go to C:\Users\\Documents\Electronic Arts\The Sims 3
    • Just remember that in Windows 7 Documents is under Libraries, Windows Vista is under Documents, Windows XP is under My Documents.

    1. Create a folder and name it Mods. (watch the case it must be exact)
    2. Click to open the Mods folder so you are inside it.
    3. Create a sub-folder within the Mods folder and name it Packages. (watch the case it must be exact)

  3. Saving the new Resource.cfg file
    1. Hit your back button and go back to the Mods folder so you are on the same level.
    2. Download / save the new Resource.cfg file located at this link...http://nraas.wikispaces.com/file/detail/Resource.zip
    3. Unpack the file to your Documents\ Electronic Arts\ The Sims 3\ Mods folder.

  4. Extract the (.package) files from the (.rar or .zip) files.
    1. User whatever program (i.e. WinRAR, WinZip, 7Zip) that you use to extract the (.package) file for the Mods.
    2. After you have the (.package) file extracted, cut/copy (whichever you prefer) then paste only the (.package) file into the Packages sub-folder.

  5. Delete the four cache files.
    1. You may also want to delete the four cache files in "The Sims 3" folder under Documents before you restart your game.
      • CASPartCache.package
      • compositorCache.package
      • scriptCache.package
      • simCompositorCache.package
      • socialCache.package (Note: You can delete this cache file as well "if" you have the Showtime EP installed.)

  6. Once you have all the (.package) files in the Packages sub-folder, restart your game. You should get a pop-up notifying you that you have mods installed.

Sony Vegas : Cara Mengurangi Durasi Foto


CARA OTOMATIS MENGURANGI DURASI BANYAK GAMBAR PADA SONY VEGAS
Assalamu'alaikum...
 setelah mencari-cari di google akhirnya ketemu juga cara memperpendek durasi banyak gambar secara otomatis, biar gak capek... bayangkan aja kalo mau buat video stop motion butuh gambar yang banyak dan mau ngedit satu persatu? gila hahahaha.
 misalnya 100 gambar hanya jadi setengah menit tapi ngeditnya sampe ele' hahaha.. gak mau terulang lagi pengalaman itu. langsung aja ya sobat. ini caranya 

1. klik options
2. preferences 
3. editing 
4. new still image length diganti sesuai keinginan anda untuk stop motion kalo mau gerakan video anda bagus pake 0.100fps atau paling lambat 0.250fps semoga bisa membantu. 


NB : silahkan dikopi paste gak apa2.. mari berbagi ilmu pengetahuan dan pengalaman

Friday, December 5, 2014

Cara Mengatasi Background Kuning di Windows Photo Viewer


Cara Mengatasi Background Kuning di Windows Photo Viewer
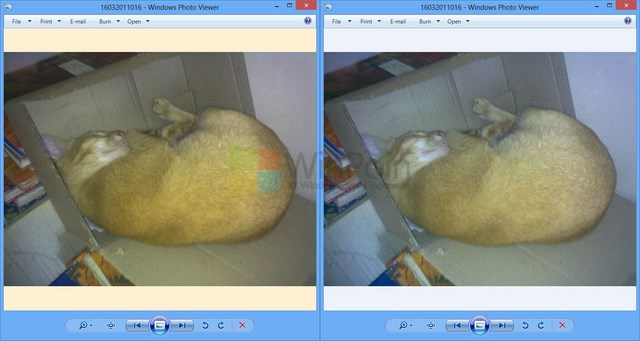
Buat kamu yang pernah mengalami yang namanya penyakit kuning atau orange di background Windows Photo Viewer, kali ini WinPoin punya cara untuk mengatasinya. Penyakit background kuning di Windows Photo Viewer ini biasanya terjadi pada Windows 7 ataupun Windows 8. Entah ini dikarenakan bug Windows atau device monitor yang tidak support dengan Windows, namun WinPoin berhasil menemukan solusi untuk mengatasi masalah ini. Bagi kamu yang mengalami masalah penyakit background kuning di Windows Photo Viewer, berikut cara mengatasinya:
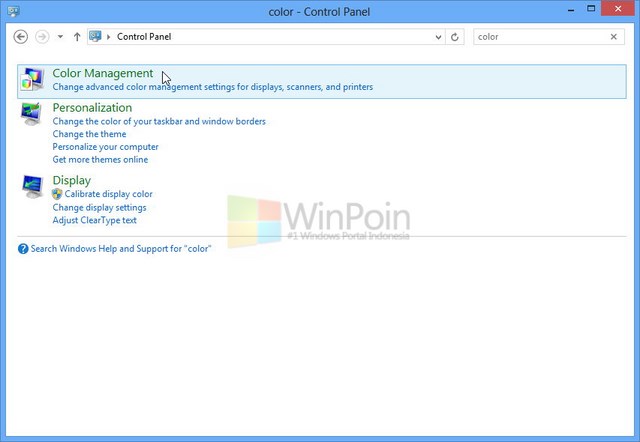
Pertama-tama buka Control Panel, ketikkan Color pada menu search. Setelah itu klik Color Management.
Cara Mengatasi Background Kuning di Windows Photo Viewer

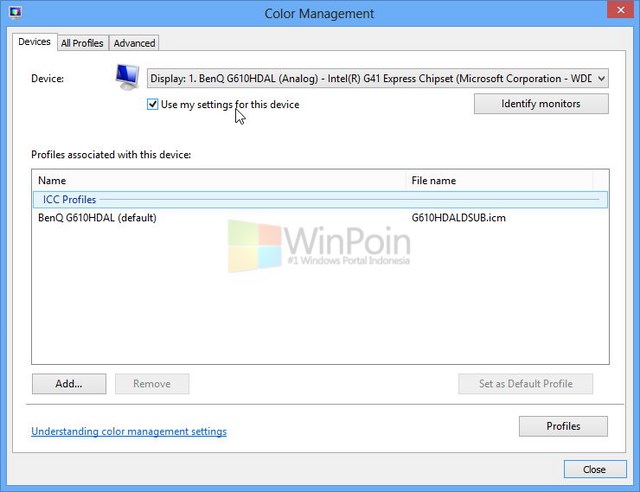
Centang bagian “Use my settings for this device.”
Cara Mengatasi Background Kuning di Windows Photo Viewer

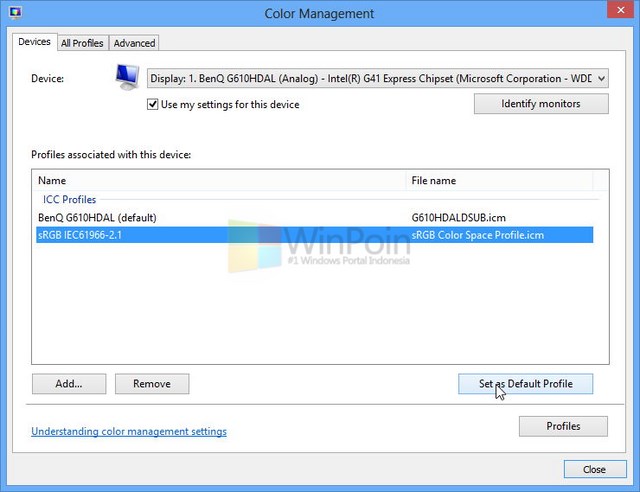
Klik Add, lalu pilih “sRGB IEC61966-2.1” dan klik OK.
Cara Mengatasi Background Kuning di Windows Photo Viewer

Terakhir pilih sRGB IEC61966-2.1 sebagai pengaturan deafult dengan mengklik “Set as Deafult Profile.”
Cara Mengatasi Background Kuning di Windows Photo Viewer

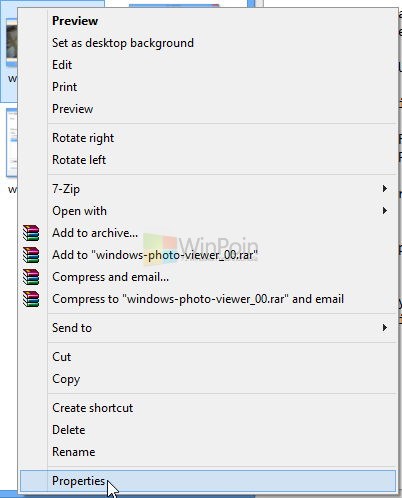
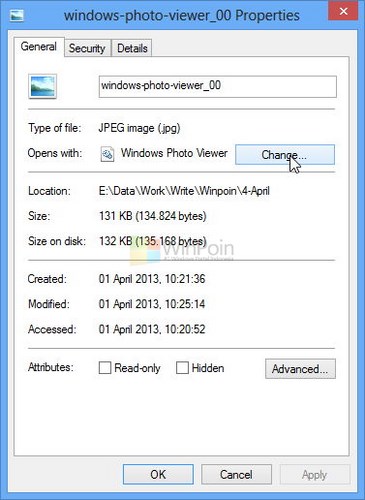
Jika warna background pada Windows Photo Viewer masih kuning, coba properties pada gambar.
Cara Mengatasi Background Kuning di Windows Photo Viewer

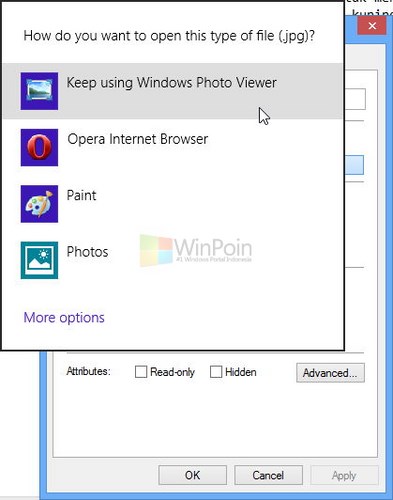
Kemudian pilih Open With dengan mengklik “Change,” lalu pilih Windows Photo Viewer.
Cara Mengatasi Background Kuning di Windows Photo Viewer